关于Google、GitHub的三方登录
关于Google、GitHub的三方登录
OAuth 2.0 是一种授权协议,它允许应用程序安全地获取对其他应用程序或服务的有限访问权限。通俗地说,OAuth 2.0 就像是你去酒店的时候使用自己的信用卡来获取房间钥匙卡。
想象一下,你到了一家酒店,前台并不直接给你房间的机械钥匙,而是用你的信用卡复制了一张只能开启你所预订的那个房间的电子钥匙卡。这张卡可以让你在入住期间自由进出房间,但不能用来做其他事情,比如打开其他客人的房间或者进入酒店的受限区域。并且,当你退房时,这张卡就失效了。
同样地,在互联网世界里,当你使用某个应用(比如一个手机上的第三方照片打印服务)想要访问你储存在另一个服务(如Google相册)上的照片时,这个应用不会直接向你索取你的Google账号和密码。相反,它会通过OAuth 2.0协议请求Google给它一个“钥匙卡”,也就是一个特殊的令牌(Token)。这个令牌可以让该应用在一定时间内,并且只针对你授予的具体权限(例如,仅能查看或下载照片,而不能上传或删除),来访问你的Google相册。
这样做的好处是,即使这个令牌被不法分子获取,他们也只能在这个令牌的权限范围内进行操作,而且一旦令牌过期或者你撤销了授权,它们就再也无法使用这个令牌访问你的资源了。此外,用户也不需要分享他们的用户名和密码给第三方应用,从而提高了安全性。
使用 Google 谷歌 OAuth 2.0 服务登录第三方网站
步骤一:创建OAuth 2.0 客户端
Google OAuth 2.0服务
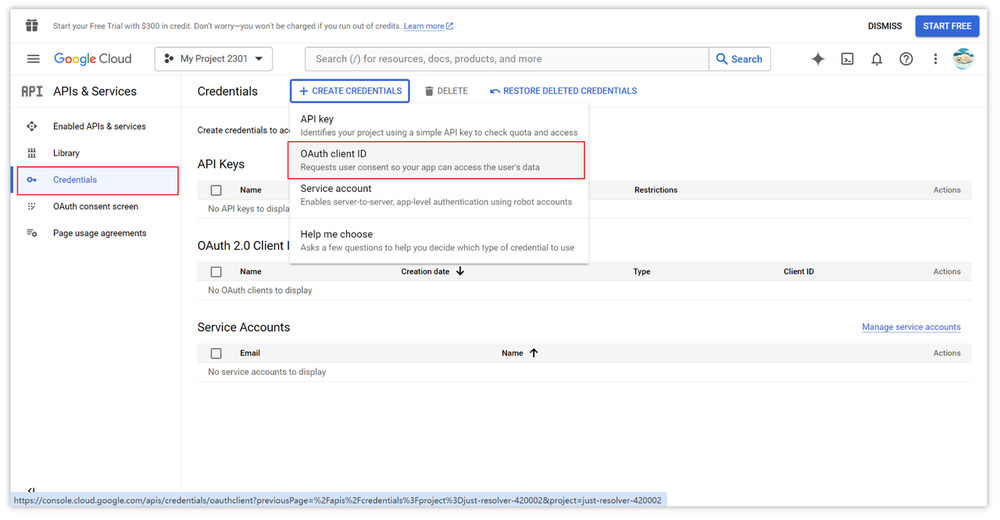
- 访问 Google Cloud Console
- 创建一个新的项目或选择现有项目。
- 导航到“API和服务” > “凭据”,点击“创建凭据”然后选择“OAuth 2.0客户端ID”。
- 配置OAuth同意屏幕,提供必要的信息(如应用名称等)。
- 设置重定向URI(Redirect URIs),这是Google在授权完成后将用户重定向回的URL。
- 获取OAuth 2.0 客户端ID和客户端密钥。
GitHub OAuth 2.0 服务
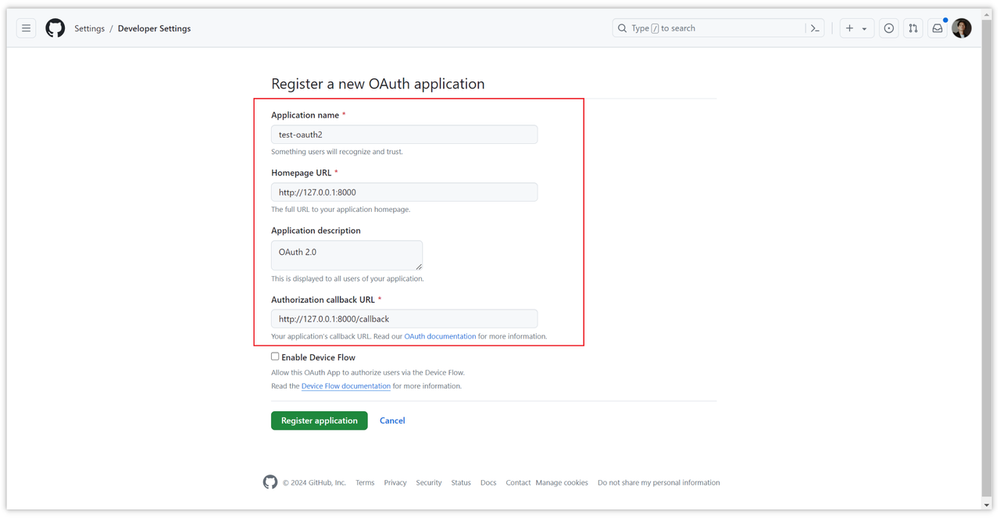
- 访问 GitHub Developer Settings
- 创建一个新的OAuth应用程序。
- 配置OAuth同意屏幕,提供必要的信息(如应用名称等)。
- 设置Homepage URL(调试域名)和Authorization callback URL(授权回调URL)。
- 获取OAuth 2.0 客户端ID和客户端密钥。
步骤二:在应用中获取登录授权URL
配置登录接口,使用fastapi实现案例
class OAuthHandler:
    def __init__(self):
        self.google_client_id = os.getenv("GOOGLE_CLIENT_ID")
        self.google_client_secret = os.getenv("GOOGLE_CLIENT_SECRET")
        self.backend_url = os.getenv("BACKEND_URL")
    def get_google_auth_url(self) -> str:
        """获取Google登录授权URL"""
        state = str(uuid.uuid4())
        redirect_uri = f"{self.backend_url}/oauth/google/callback"

        params = {
            'client_id': self.google_client_id,
            'redirect_uri': redirect_uri,
            'response_type': 'code',
            'scope': 'openid email profile',
            'state': state,
            'access_type': 'offline',
            'prompt': 'consent'
        }

        return f"https://accounts.google.com/o/oauth2/v2/auth?{urlencode(params)}"
app = FastAPI()

origins = [
    "http://localhost:8000",
    "https://accounts.google.com",
    "https://oauth2.googleapis.com",
    "https://www.googleapis.com"
]

# 配置中间件防止跨域引发错误
app.add_middleware(
    CORSMiddleware,
    allow_origins=origins,
    allow_credentials=True,
    allow_methods=["*"],
    allow_headers=["*"],
    expose_headers=["*"]
)

@app.get("/oauth/google/login")
async def google_login():
    oauth_handler = OAuthHandler()
    return {"url": oauth_handler.get_google_auth_url()}
步骤三:处理授权回调
class OAuthHandler:
    def __init__(self):
        self.google_client_id = os.getenv("GOOGLE_CLIENT_ID")
        self.google_client_secret = os.getenv("GOOGLE_CLIENT_SECRET")
        self.backend_url = os.getenv("BACKEND_URL")
    def get_google_auth_url(self) -> str:
        """获取Google登录授权URL"""
        state = str(uuid.uuid4())
        redirect_uri = f"{self.backend_url}/oauth/google/callback"

        params = {
            'client_id': self.google_client_id,
            'redirect_uri': redirect_uri,
            'response_type': 'code',
            'scope': 'openid email profile',
            'state': state,
            'access_type': 'offline',
            'prompt': 'consent'
        }

        return f"https://accounts.google.com/o/oauth2/v2/auth?{urlencode(params)}"

    async def handle_google_callback(self, code: str) -> Dict:
        """处理Google回调"""
        try:
            redirect_uri = f"{self.backend_url}/oauth/google/callback"

            # 1. 使用授权码获取访问令牌
            async with AsyncClient() as client:
                token_response = await client.post(
                    'https://oauth2.googleapis.com/token',
                    data={
                        'client_id': self.google_client_id,
                        'client_secret': self.google_client_secret,
                        'code': code,
                        'grant_type': 'authorization_code',
                        'redirect_uri': redirect_uri
                    }
                )

                if token_response.status_code != 200:
                    error_detail = token_response.json()
                    raise OAuthError(f"Google Token获取失败: {error_detail}")

                token_data = token_response.json()

                # 2. 获取用户信息
                user_response = await client.get(
                    'https://www.googleapis.com/oauth2/v3/userinfo',
                    headers={'Authorization': f'Bearer {token_data["access_token"]}'}
                )

                if user_response.status_code != 200:
                    error_detail = user_response.json()
                    raise OAuthError(f"Google用户信息获取失败: {error_detail}")

                user_info = user_response.json()
                return await self.handle_oauth_user(
                    platform="google",
                    platform_id=user_info["sub"],
                    email=user_info["email"],
                    username=f"google_{user_info['sub']}"
                )
        except HTTPError as e:
            raise OAuthError(f"Google回调处理失败: {str(e)}")
app = FastAPI()

origins = [
    "http://localhost:8000",
    "https://accounts.google.com",
    "https://oauth2.googleapis.com",
    "https://www.googleapis.com"
]

# 配置中间件防止跨域引发错误
app.add_middleware(
    CORSMiddleware,
    allow_origins=origins,
    allow_credentials=True,
    allow_methods=["*"],
    allow_headers=["*"],
    expose_headers=["*"]
)

@app.get("/oauth/google/login")
async def google_login():
    oauth_handler = OAuthHandler()
    return {"url": oauth_handler.get_google_auth_url()}

@app.get("/oauth/google/callback")
async def google_callback(code: str):
    oauth_handler = OAuthHandler()
    return await oauth_handler.handle_google_callback(code)
步骤四:处理授权回调用户信息
class OAuthHandler:
    def __init__(self):
        self.google_client_id = os.getenv("GOOGLE_CLIENT_ID")
        self.google_client_secret = os.getenv("GOOGLE_CLIENT_SECRET")
        self.backend_url = os.getenv("BACKEND_URL")
    def get_google_auth_url(self) -> str:
        """获取Google登录授权URL"""
        state = str(uuid.uuid4())
        redirect_uri = f"{self.backend_url}/oauth/google/callback"

        params = {
            'client_id': self.google_client_id,
            'redirect_uri': redirect_uri,
            'response_type': 'code',
            'scope': 'openid email profile',
            'state': state,
            'access_type': 'offline',
            'prompt': 'consent'
        }

        return f"https://accounts.google.com/o/oauth2/v2/auth?{urlencode(params)}"

    async def handle_google_callback(self, code: str) -> Dict:
        """处理Google回调"""
        try:
            redirect_uri = f"{self.backend_url}/oauth/google/callback"

            # 1. 使用授权码获取访问令牌
            async with AsyncClient() as client:
                token_response = await client.post(
                    'https://oauth2.googleapis.com/token',
                    data={
                        'client_id': self.google_client_id,
                        'client_secret': self.google_client_secret,
                        'code': code,
                        'grant_type': 'authorization_code',
                        'redirect_uri': redirect_uri
                    }
                )

                if token_response.status_code != 200:
                    error_detail = token_response.json()
                    raise OAuthError(f"Google Token获取失败: {error_detail}")

                token_data = token_response.json()

                # 2. 获取用户信息
                user_response = await client.get(
                    'https://www.googleapis.com/oauth2/v3/userinfo',
                    headers={'Authorization': f'Bearer {token_data["access_token"]}'}
                )

                if user_response.status_code != 200:
                    error_detail = user_response.json()
                    raise OAuthError(f"Google用户信息获取失败: {error_detail}")

                user_info = user_response.json()
                return await self.handle_oauth_user(
                    platform="google",
                    platform_id=user_info["sub"],
                    email=user_info["email"],
                    username=f"google_{user_info['sub']}"
                )
        except HTTPError as e:
            raise OAuthError(f"Google回调处理失败: {str(e)}")

    async def handle_oauth_user(self, platform: str, platform_id: str, email: str, username: str) -> Dict:
        """处理OAuth用户信息"""
        # 这里可以添加对用户信息的处理逻辑,例如保存到数据库或返回给前端
        return {"platform": platform, "platform_id": platform_id, "email": email, "username": username}

oauth_handler = OAuthHandler()
上面案例中使用fastapi实现案例,使用fastapi-jwt-auth实现jwt认证,也可以直接在回调中返回携带token的前端页面
ps: GitHub本地调试中设置的URL仍然可能会因为非https而报错,可以使用使用ngrok进行调试,将本地服务映射到公网,然后使用公网地址进行调试。